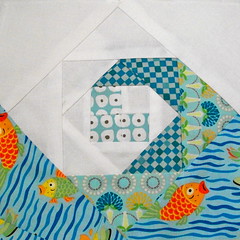
At long last. I've been wanting to do a tutorial but I do so much technical writing at work that I normally have no energy for it, but thanks to a day off for Veteran's Day, and paper piecing square for one of my bees, I had some time to do this.
So, if you think paper piecing is one of those great mysteries, it was to me until I tried it, read along and see if any of this helps. Please note, paper piecing is difficult, take your time and don't get too frustrated if you make mistakes (I'm saying that to myself, too!)
WHAT SUPPLIES DO I NEED?
Besides the basics of scissors or rotary cutter, thread, sewing machine and iron, you will need:Paper template - this is the marked template that you will sew your fabric to. It provides the sewing lines, the order of sewing and may or may not indicate which fabric to use for each piece. You can find these online, here are a few of my resources: Practice on a simple design, FITF String Quilt, Star templates, Colorwheel Geese.
The square I'm using is called Snail's Trail and is being used by one of my bee members as a wave in an ocean themed quilt.

Fabric - you can use scraps or yardage. The key is cutting each piece so it's big enough after you sew it on the template. It must have at least 1/4" seam allowance over the pattern piece.
STEP 1: Get to know your template. A paper piecing template will have numbers in each section indicating the order of sewing. Since you will be placing fabric OVER the template, you will not be able to see your stitch line. I like to either print my template on vellum (a paper you can see through) or trace the lines onto the back of my template by putting the paper on a window during the day. Just the basics lines. You can also use pins on the front to mark the start and end and sew from pin to pin.

IMPORTANT: You can reverse the pattern by sewing on the front or the back of the pattern. I like to sew on the front. If I had sewn the pieces to the back of this template, the "wave" would have been reversed. Make sure you know what you want if that's important.
STEP 2: Prepare the first piece. The first piece on a template is not sewn. You can either pin it in place, just hold it down OR I like to use a glue stick, just a little glue to hold it down. This piece required making a 3.25 x 3.25 inch center using 4 blocks that were 1.5" each. This pieced square is used as the starting piece and I have glued it to the center of the pattern. In the photo you see that the piece overlaps the stitch line by about 1/4". Very important as you need that allowance for sewing on your subsequent pieces.

STEP 3: Cut and sew the second piece onto the template. I cut my fabric as I go. So first I cut a piece of fabric that fits over the triangle with the "5" on it (pieces 1, 2, 3 and 4 were pieced before putting them on the paper, 5 is the next).

Place the cut piece wrong side onto the template so that when you sew the seam line and fold back, it will cover the "5" triangle with 1/4" over the size. Place fabric on template, WRONG side down.

Now, I turn the fabric over at this point and sew on the line I traced but you can sew from the front size but you'll need to mark the seam line since you won't be able to see it under the fabric.
 (in this photo, I did not trace the line I'm sewing on but I can see it and I can see the two points that I'm sewing from and to)
 Turn it over to the front again:

Fold it back to the right side and press:

STEP 4: Sew the next piece, piece 6. On the template, find the "6" and follow the steps above to cut a fabric piece (this one on my template was indicated to be white). Notice I cut this piece rectangular. There is no formula, you don't have to cut it the shape of the piece you're sewing onto. My rule of thumb is the bigger the better when cutting.

After the piece was sewn and pressed:

Continue until you've sewn pieces 7 and 8 and your middle is finished.

STEP 5: Finish cutting and sewing the rest of the square. Following your numbers, and using the fabrics indicated on the pattern, continue sewing the pieces onto the template.
FINISHING UP: Here's my finished, untrimmed square:

Turn it over and trim the fabric up to the paper template:

Turn over:

Remove the paper from the back:
TIP: Using a small stitch helps to perforate the fabric. I like to use a much smaller stitch. However, make sure it's not so small you can't rip out mistakes.
Be careful that you don't rip out any seams. Backstitching will prevent this but I usually don't backstitch when piecing.

And here's the final product, front and back! CONGRATULATIONS you did it! Go reward yourself now.


PROBLEMS?
The problem I run into most often is not cutting my piece large enough. In this photo you can see that after I sewed it and pressed, there is a triangle of the pattern that is not covered by the fabric. So I had to rip it out and cut a bigger piece of fabric OR if I had enough fabric already, just move the piece up and stitch so it covers the whole area plus 1/4".
BAD:

GOOD:

Another mistake I made on this block is that I somehow messed up my outer pieces TWICE. The seam ripper is my friend. Sigh. Fortunately the pieces were on the outer edge so it was easy to rip it out and resew.
WRONG

STILL WRONG

RIGHT

OTHER TIPS:
As the pieces get bigger, I find I have to often pin before sewing:

Sewing with pins:

Trimming the Seams: Although they will be hidden, it's good to trim the seams so it doesn't add bulk.

I don't have enough fabric! If you're in a quilt bee and someone has sent you specific fabric to use and you don't have enough fabric (usually due to ME cutting it too small), you can piece the fabric to make it fit. I try to match the pattern if I can and usually it's the part of the fabric that's near the edge so hopefully it won't show. Here is the back of one I had to piece:

Thank you for taking the time to tut this. It was very helpful!
ReplyDelete