Thursday, December 23, 2010

Simple Christmas

My life has been crazy this month.  Work has been really amped up, my husband lost his job, and Christmas seemed like a chore so I went simple.  

presents

stocking

waiting

nativity

Sunday, November 14, 2010

Book Review! The Practical Guide to Patchwork


Small Plates quilt from The Practical Guide to Patchwork by Elizabeth Hartman
Kitchen Window quilt from The Practical Guide to Patchwork by Elizabeth Hartman
The Practical Guide to Patchwork, New Basics for the Modern Quilter, by Elizabeth Hartman, published by Stash Books

There is a new craft movement today that is only picking up speed as it picks up a whole new generation of creative do-it-yourselfers and quilting is one of the arts that has been picked up and revitalized using new designer fabrics, techniques and even a little new technology.  This movement is spreading like wildfire due to social networking websites like Flickr, Facebook and individual blogs. 

Why a modern quilting guide?  Was there something wrong with the traditional and still very active quilting methods?  As someone who sewed their first dress in 1969, 

and made their first quilt in 1982, then let my sewing skills atrophy for a while, let me say, this movement is just what our recession tired world needed!

I “met” the author, Elizabeth Hartman by finding her blog, Oh Fransson!, online one day, probably through one of the MANY Flickr groups I belong to that are related to fabric, sewing, quilting and the like.  I was drawn to the blog because it was written so concisely, yet not wordy, simple to understand, gorgeous photos of brilliant techniques and perfect craftsmanship.  There are a million quilt bloggers out there but Elizabeth is able to boil down all the fluff into exactly what is needed and wanted by the modern quilter.

And so her book, just as lovely, practical and wonderfully applicable to all levels of whatever you call yourself; sewist, sewer, seamstress, fabric artist or quilter!


The book is laid out in the following sections:

All the Basics:

         Materials and Supplies
A description of fabric types, including pre-cuts (charm packs, jelly rolls) and how to select your fabric and some basic fabric terminology for the new quilter.
         Planning your Quilt
What I like best about Elizabeth is her ability to describe color choices.  This is certainly why her quilts are so gorgeous.  She discusses how to choose colors, put them together, warm colors, cool colors, using opposites on the color wheel.  Truly brilliant.
         Step-by-Step Quilt Construction
A step by step guide to all the aspects of making a quilt; cutting fabric, piecing by machine (most of her instructions are for machine sewn quilts), ironing, machine quilting with a walking foot and free motion.  Also, a quilt binding tutorial which really shows the steps in photos that is so clear that anyone should be able to figure out those pesky mitered corners.

Projects:
Divided into Projects for beginners, confident beginners and intermediates, these sections contain detailed instructions for making 12 different quilts.  Each quilt pattern instruction includes a photo of the finished quilt front and back, diagrams for piecing blocks and the whole quilt, a list of materials including the exact measurement of fabrics and batting, cutting instructions, making the blocks, making the quilt top, making the quilt back, finishing the quilt AND alternate ideas and more fabric options.  The alternate ideas and fabric options are genius.  Photos of the same block using different fabrics and colors are provided so you can change the pattern, even ideas on amounts of fabric needed to change the quilt. This is why I like Elizabeth.  She is not just a teacher or instructor but a mentor; she wants you to use your own creativity.  It’s nice to see this humble attitude in today’s sometimes too narcissistic world. 

Tips:  Sprinkled throughout the book are VERY helpful tips, for example, bed quilt sizes for twin, double, queen and king are provided in the planning your quilt section.  Each quilt instruction has a tip or two specific to that quilt, how to make your squares line up more accurately.


The book is so practical and makes the projects look simple and with the clear instructions and photographs and tips, they really are.  Elizabeth’s tone in this book is encouraging, learn from me but make it your own.  The quilt patterns lend themselves to that philosophy as well. 

The only negatives I can think of are that for the quilter who is looking for a piecing challenge, this is not the book for you.  If you're looking for a new technical challenge in your quilting, again, the book is not for you. 

Modern quilting seems to highlight the fabrics more than the patterns, using simple yet appealing patterns.  Sometimes the modern quilt is purposely wonky.  This allows the colors and fabric patterns to become more important and this book really takes this to its highest level.  If you have never quilted, quilted a little or quilted for years, you will take away a wealth of information and inspiration from The Practical Guide to Patchwork.

Thursday, November 11, 2010

Paper Piecing TUTORIAL

Paper Piecing TUTORIAL

At long last.  I've been wanting to do a tutorial but I do so much technical writing at work that I normally have no energy for it, but thanks to a day off for Veteran's Day, and paper piecing square for one of my bees, I had some time to do this.

So, if you think paper piecing is one of those great mysteries, it was to me until I tried it, read along and see if any of this helps.  Please note, paper piecing is difficult, take your time and don't get too frustrated if you make mistakes (I'm saying that to myself, too!)

WHAT SUPPLIES DO I NEED?
Besides the basics of scissors or rotary cutter, thread, sewing machine and iron, you will need:

Paper template - this is the marked template that you will sew your fabric to.  It provides the sewing lines, the order of sewing and may or may not indicate which fabric to use for each piece.  You can find these online, here are a few of my resources:  Practice on a simple design, FITF String Quilt, Star templates, Colorwheel Geese.

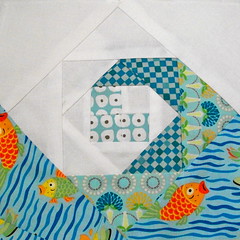
The square I'm using is called Snail's Trail and is being used by one of my bee members as a wave in an ocean themed quilt.  
1 - pattern front

Fabric - you can use scraps or yardage.  The key is cutting each piece so it's big enough after you sew it on the template.  It must have at least 1/4" seam allowance over the pattern piece.

STEP 1:  Get to know your template.   A paper piecing template will have numbers in each section indicating the order of sewing.  Since you will be placing fabric OVER the template, you will not be able to see your stitch line.  I like to either print my template on vellum (a paper you can see through) or trace the lines onto the back of my template by putting the paper on a window during the day.  Just the basics lines.  You can also use pins on the front to mark the start and end and sew from pin to pin.
 2 - pattern back, trace lines

IMPORTANT:  You can reverse the pattern by sewing on the front or the back of the pattern.  I like to sew on the front.  If I had sewn the pieces to the back of this template, the "wave" would have been reversed.  Make sure you know what you want if that's important. 

 STEP 2:  Prepare the first piece. The first piece on a template is not sewn.  You can either pin it in place, just hold it down OR I like to use a glue stick, just a little glue to hold it down.  This piece required making a 3.25 x 3.25 inch center using 4 blocks that were 1.5" each.  This pieced square is used as the starting piece and I have glued it to the center of the pattern.  In the photo you see that the piece overlaps the stitch line by about 1/4".  Very important as you need that allowance for sewing on your subsequent pieces.
3 - place first piece

STEP 3:  Cut and sew the second piece onto the template.  I cut my fabric as I go.  So first I cut a piece of fabric that fits over the triangle with the "5" on it (pieces 1, 2, 3 and 4 were pieced before putting them on the paper, 5 is the next).
5 - cut fabric

Place the cut piece wrong side onto the template so that when you sew the seam line and fold back, it will cover the "5" triangle with 1/4" over the size.  Place fabric on template, WRONG side down.

6 - place piece to sew

Now, I turn the fabric over at this point and sew on the line I traced but you can sew from the front size but you'll need to mark the seam line since you won't be able to see it under the fabric.
7 - turn and sew (in this photo, I did not trace the line I'm sewing on but I can see it and I can see the two points that I'm sewing from and to)

Turn it over to the front again:
8 - sewed

Fold it back to the right side and press:
9 - pressed open
STEP 4:  Sew the next piece, piece 6.  On the template, find the "6" and follow the steps above to cut a fabric piece (this one on my template was indicated to be white).  Notice I cut this piece rectangular.  There is no formula, you don't have to cut it the shape of the piece you're sewing onto.  My rule of thumb is the bigger the better when cutting. 
10 - start second piece

After the piece was sewn and pressed:
11 - second piece sewn

Continue until you've sewn pieces 7 and 8 and your middle is finished.
12 - middle done


STEP 5:  Finish cutting and sewing the rest of the square.  Following your numbers, and using the fabrics indicated on the pattern, continue sewing the pieces onto the template.

FINISHING UP:  Here's my finished, untrimmed square:
22 - finished front untrimmed

Turn it over and trim the fabric up to the paper template:
23 - trimming back

Turn over:
24 - trimmed front

Remove the paper from the back:
TIPUsing a small stitch helps to perforate the fabric.  I like to use a much smaller stitch.  However, make sure it's not so small you can't rip out mistakes.  
Be careful that you don't rip out any seams.  Backstitching will prevent this but I usually don't backstitch when piecing.
25 - tear away paper

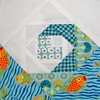
And here's the final product, front and back!  CONGRATULATIONS you did it!  Go reward yourself now.

Paper Piecing TUTORIAL


100_3415

PROBLEMS?
The problem I run into most often is not cutting my piece large enough.  In this photo you can see that after I sewed it and pressed, there is a triangle of the pattern that is not covered by the fabric.  So I had to rip it out and cut a bigger piece of fabric OR if I had enough fabric already, just move the piece up and stitch so it covers the whole area plus 1/4".
BAD:
15 - shows mistake

GOOD:
16- Mistake fixed


Another mistake I made on this block is that I somehow messed up my outer pieces TWICE.  The seam ripper is my friend.  Sigh.  Fortunately the pieces were on the outer edge so it was easy to rip it out and resew.

WRONG
27 - final

STILL WRONG
Snails Trail Block for MaryC

RIGHT
Paper Piecing TUTORIAL

OTHER TIPS:
As the pieces get bigger, I find I have to often pin before sewing:
17 - sometimes pim

Sewing with pins:
18 - sewing pinned

Trimming the Seams:  Although they will be hidden, it's good to trim the seams so it doesn't add bulk.
19 - trim seams

I don't have enough fabric!  If you're in a quilt bee and someone has sent you specific fabric to use and you don't have enough fabric (usually due to ME cutting it too small), you can piece the fabric to make it fit.  I try to match the pattern if I can and usually it's the part of the fabric that's near the edge so hopefully it won't show.  Here is the back of one I had to piece:
21 - piecing fabric

Sunday, November 7, 2010

Um. Seriously Behind


So, I just learned today, duh, that there is a Google reader. Doinggggg. I've been logging into my blog and going to my Dashboard to read my subscribed to blogs. I hate it when that happens.

OK, in honor of that, I would love to add some more *favorite* blogs to my list. Do you have a favorite that I don't know about? Please tell!!

Meanwhile, after the de-stashapalooza of last Sunday and Monday (WHEW) I have been busy finishing up a bunch o' commissioned works.

I sold this pillow at an auction to benefit the New England Camp Cedarbrook and the auction winner wanted a second pillow, which only took me 6 weeks to finish.

And today I am finishing up the straight line quilting on a Vespa scooter quilt, commissioned by a friend who bought the center print on canvas in Italy this summer.  By the way, straight quilting is MUCH much harder for me than the "stipple" method because it really shows if you stitch a little crooked.  I do love using the walking foot with the guide.  I just need to practice more.  Also, I'm using heavyweight fabrics so I had to rip a bunch out when I checked the back and had puckers.

I've decided to do some free motion drawing with thread on the centerpiece. I think this will look SUPER cool if I practice a bunch first.  I'm going to use charcoal thread and the back is a gorgeous natural linen so the Vespa drawing should show up well on the back.

And finally I leave you with this morning's sunrise in the city.  It was the end of daylight savings and I opened the curtain to see if it was light out and saw the most amazing sky so I grabbed the camera and ran outside. 

Sunday, October 31, 2010

Destashing!

DESTASH

Destashing

I am swimming in fabric and I will never sew it all. Please help me!

I have listed about half of what I want to sell so check back. My destash shop is here:

http://www.etsy.com/shop/sewinggeekSTASH

Some things I am parting with include... Heather Ross FFA I and II, Lotta Jansdotter, Ginseng Woodgrain in chocolate, stone and mulberry, Echino Quiet Ground scraps, Oililly, and more. I'm finished for today but will be listing more tomorrow.

Friday, October 29, 2010

Dog Tired

Dog Tired

Dog Tired

Dog Tired

Dog Tired
***Warning***
Introspective Blog Post

Have you ever noticed how dogs just have THE life? They eat, sleep, poop, walk, bark then start all over again. Sleeping is a big part of their life. I realized recently that I don't even know how to RELAX much less sleep, yes, I do sleep, but I normally COLLAPSE into bed and when I wake up 6 or 8 hours later, I start the day running, until I COLLAPSE into bed at night.

I've thought about how this affects my creative side and realized YOWZA, not good. I work full-time and maintain an old house with lots of pets and a Cuban husband (read: used to having a woman do his cooking, cleaning, etc.). My job is demanding and stressful but it pays the bills and allows me to buy all the FABRIC that I want and need. But is this all worth it?

I'm thinking of re-thinking some of my creative efforts like my Flickr life, my Etsy shops, all the online blogs and groups I participate in. I'm in quilting bees and swaps and I trade fabrics and and and... when do I actually have time to be CREATIVE? This is my dilemma.

I have no solution. I recently saw a popular Etsy shop closed because she had just made enough things. I was so jealous. WAIT, why can't I do that? I DON'T KNOW. I'm kind of afraid that I'll disappear into nothingness if I don't keep my fingers in everything.

Yes, I'm a little bit too introspective this morning. I just thought I would see if anyone else felt the same or had any great ideas or inspiration.


Dog Tired

Saturday, October 9, 2010

For the Love of Coffee

Happy Birthday 70s Style!

So um yeah. This was my 14th birthday I think. I'm in the groovy oval glasses, braces and purple shirt. Brothers and sisters and Dad in the back and Mom taking the photo. I really love this photo and the avocado tablecloth and the yellow fondue pot (that was my favorite birthday dinner, that's how I know this photo was was MY birthday) and the oh-so-lovely wallpaper and I would kill to have those dishes now! And love my little sister all excited for some reason. If we took this same photo today, oh I hate to think of it! We're all a little, um, more rotund, some of us are prettier, some of us have a nice thick middle, no braces, everyone has their teeth and Dad, God love him, is no longer shiny-cheeked.

So I'm really not trying to get birthday gifts here (but feel free to send cash!) but since my blog IS my birthday, October Eight, I thought I would remind you that yesterday (ha ha, too late) was indeed my birthday.

Every Girl Should Have One

I actually had a good day yesterday, even though I had to work all day and my husband had to work late so we didn't really celebrate but I tell you, I just LOVE simple things like making myself a simple but yummy dinner, cracking open a good bottle of wine and vegging in front of a good DVD movie with the pup sitting at my side (only because she wants some of my steak).

That's about how last night went, except... I made the SILLY mistake of opening a really good bottle of wine and wasn't paying attention and drank about 3/4 of the bottle, eek! I fell asleep on the sofa and then woke up when above-referenced pup heard the wind and had to start barking INSIDE the house. I woke up abruptly and thought it must be around 5 AM. Nope, it was 2:30 AM and I was WIDE AWAKE. That's why I confessed to the wine, the sugar in wine tends to give me a sugar buzz about 6 hours later, darn it. So I was tossing and turning and tossing and turning and before my husband hit me for keeping him from sleeping, I got up. Some web surfing for an hour, then back to bed. Usually does the trick.

Rosie Sleeping

However, as I was dozing back to sleep at 3:30 AM, I remembered that I was unable to find the metal filter basked for my espresso machine last night and was pretty sure it was in the trash, which I so efficiently carried out to the dumpster the morning before. So instead of floating gently back to sleep, I start to think about how to get into the dumpster in the morning!

I did wake up, to the dog alarm, sigh, and 7:30 this morning and first thing I did was run out to the dumpster. There was my white trash bag and believe it or not, I could see the outline of the filter basket! (BTW, these come from Italy and have to be ordered and God forbid I should not be able to have my morning espresso for the 2 to 3 weeks it would take to get a replacement!)

Ah espresso

But the fun was not over. There was hardly anything else in the dumpster so it was on the bottom and I am not very tall. Darn it. I had to go back to my yard, I picked up a rake, some gloves, and set out again to the alley. It was actually not very hard to get the bag out with the rake but I couldn't find the filter basket so ended up having to dump out the trash to find it and then "YIPPPEEEE", oops. I hope I didn't wake the neighbors. That's where the gloves came in handy, sorting through the icky mess and putting it back in the bag. Oh the dog LOVED this part.

So that was my exciting birthday! But it made me happy. Now I'm going to sew and play with my fabric for 3 days because Monday is a holiday, YAY.

Fabric Stash