Showing posts with label sewing. Show all posts

Tuesday, October 1, 2013

Washi Dress

 WASHI DRESS Review


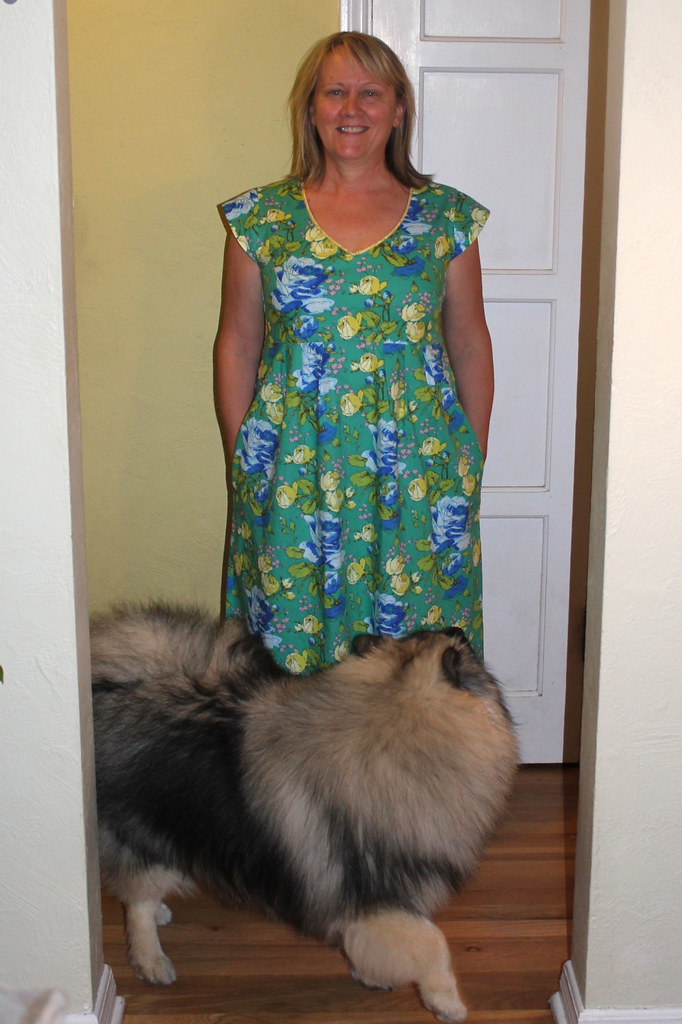
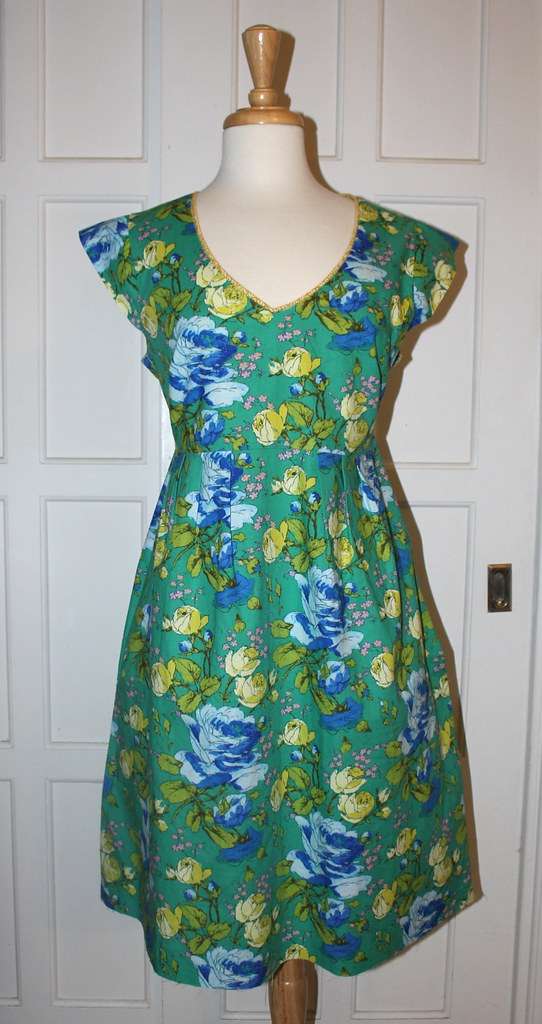
I may be the LAST person on the planet to have discovered this pattern but I finally had some time between cleaning up flooding, work, new puppy, and normal life to make it!  I picked up the pattern at Fancy Tiger a few months ago and was trying to use a fabric in my stash.  This Amy Butler "Sketchbook Roses" fabric (in Fresh) from the Alchemy line is what I decided on.  Seems perfect for a dress like this.  For the piping I used the "Memoir" fabric in Zest (i.e. yellow) from the same line.

It really helped me to see all the different versions of the Washi as well as blog posts and the Made by Rae tutorials, really made it easier for me.  So I would like to reciprocate and provide some tips and issues I had.  I will also review the pattern on PatternReview.

What I'm covering in this post:

1.  Prepare the pattern 
2.  Make a muslin, bodice only
3.  Make the neckline a v-neck
4.  Add piping to the neckline
5.  Lin the bodice instead of facing
6.  Finish the seams (French)

1.  PREPARE THE PATTERN
Since the printed pattern (you can also purchase the PDF pattern but I bought the pattern at a store) has six sizes on it, each cutting line is delineated by a different type line.  Although this is very clear to see, I also like to highlight my size before cutting, just in case.  I used a yellow marker and drew on all the size L lines before laying out my patter.

2.  MAKE A MUSLIN


Rae suggests making a muslin in the instructions which is a great idea.  I used to rush into sewing clothes because I didn't want to "waste the time' to make a practice version but after ruining some beautiful fabrics because the final product didn't fit, I know like to make a muslin first.

For my muslin I actually used muslin because I have a lot of it around.  Basically you're just cutting out the two bodice pieces and sewing them according to direction using cheap fabric that you don't mind throwing out.

I made the Large size to accommodate my bust size, per the back of the pattern.  I tried it on and it fit perfectly, I was lucky.  No alterations needed.  My dress form is smaller than me so it looks loose but it was very fitting on me and the end of the bodice came just to the end of my bust so it is a high waisted pattern which I like but you can adjust it to fit at the waist by lengthening the bodice pieces.

3.  NECKLINE
As you can see in the muslin photo above, another great reason to make a muslin is you can draw on it with a permanent Sharpie which is what I did to try out the v-neck.  Then I drew a line on the pattern itself

and cut the "real" fabric out using that line. 

4. ADD PIPING TO NECKLINE

I think piping really adds a polish to this neckline.  I didn't have any packaged piping and decided yellow was the best accent color.  I ended up finding some cording in my sewing room that's used to make piping and had just enough of it for the neckline.  I also had the Memoir fabric left over from an
apron I made from the same fabric line and it coordinated perfectly! 

If you've never made piping, it's easy.  Buy the cording, which is a white cotton that comes in different widths.  I probably got this at Joanns.  For the size of the cording, I cut a strip of fabric 1.5 inches wide and 36" long as I needed about that length for the neckline.  Fold the strip of fabric in half along the width and then I press it lightly so I have a line to place the cording.  Place the cording in that crease tightly and then sew, using a zipper foot, right up against the edge of the cording, not sewing the cording but right next to it.  I leave about a half inch of cording out of the fabric on either end. 
And here is the finished piping!  You will need about a 1/2 or 5/8 inch of fabric coming out from where the covered cording is to allow you to pin and sew it into a seam. 

To sew, pin the piping around the neckline of the dress, lining up the raw edge of the neckline with the raw edge of the piping strip.  Baste as close to the corded area (using a zipper foot).  Then place the lining (or facing) fabric on the dress per the regular instructions and when you sew, make sure you are sewing along the same stitch line that you used to baste the piping on.  One easy way to do this is to pin the lining or facing on, then turn the dress over and stitch from the side where you can see the basting and use that as a guideline.  Use a zipper foot for this sewing as well, it allows you to get the needle very close to the piping.  When you turn the lining or facing to the right side, your seam will have that nice round piping showing along the edges!

Sorry I did not take photos when I was sewing the piping on but you can probably find some tutorials online.  And of course you can always buy piping, they sell it at fabric stores with the seam binding and hem tapes.

5.  LINE THE BODICE
Rae has excellent instructions (videos!) on her blog for doing a bodice lining so I won't explain anything here but wanted to show you what the finished dress looks like from the inside.  Also, I used a voile for the lining and since that is so light and the dress fabric was a cotton quilt weight, I lined the v-neck with iron on interfacing to make sure the neckline would stay shaped well and the lining would lay flat.
I cut some scraps of Pellon-ShapeFlex, which is a new favorite interfacing, to fit the neckline and ironed it on.  It's a midweight interfacing so it added some stiffness and stability to the voice,which is what I wanted.  I left the shoulder seams without interfacing only because my scraps weren't that long but also I didn't think it needed to go that far anyway.

6. FRENCH SEAMS
I don't have a serger and although I have a serging stitch on my regular sewing machine, I often prefer to finish my seams using the French seam method.  It just encloses those raw edges and prevents raveling when you wash.  To sew a French seam, you first put the two pieces you're sewing together, in my case the side seams of the dress, WRONG sides together.  Stitch a 1/4" seam.  Turn the dress inside out and press the seams flat so there is no extra fabric in your next seam.  I use a bamboo point turner to flatten out the seam from the inside.  Then press well.  (Note, if your raw edges have  lot of threads loose, you might want to trim them.  Also, you want the seam to only be 1/4 inch so you also may want to trim anywhere that the seam was larger than that.

The final seam will then enclose your original seam.  Your fabrics are not RIGHT side together, so you are sewing while looking at the inside of the dress.  Stitch a 1/2 to 5/8 inch seam.  Again, you want to enclose the raw edges so make sure that happens.  When you're finished sewing, open the dress to the right side and press the seam flat again.  You are finished with that seam.  On the inside it's nice an neat. 

Sometimes you might not like having that extra "flap" of fabric inside but it doesn't bother me and when I was clothes, there is no unraveling of fabric.  There is another method where you sew the seam down after enclosing it (or even without a French seam, you can do this on a regular seam) but then you will have a stitching line on the outside.  For tops I sometimes do that but on this dress, I wanted a more formal look.

I love the pattern and do plan on making it again!


Tuesday, March 5, 2013

Inspired: Part 1

L to R, Ty Pennington, Amy Butler, David Butler (photo courtesy of amybutlerdesign.com)
Thanks to Craftsy, some of the Quiltcon lectures are available to watch online for FREE, how great is that?   This weekend I watched a couple and WOW.  I'll start with David and Amy Butler.  They.are.the.cutest.couple.  You must see this video.  And this one of David Butler in his booth at quilt market 2012.  (FYI, the videos I linked to in this paragraph are so worth watching!)

Amy Butler fabrics were part of what inspired me to sew again, back around 2007-2008 when I joined Etsy.  I accumulated a LOT of Amy Butler fabric then and made a LOT of things.

I don't want to say too much more but I do want to say that what inspired me about watching the Amy Butler lecture was that she is an artist, a true creative soul.  That's what I tapped into.  She follows her creative passion and it has led her to an amazing life.  Not everyone with creative passion has an amazing life but I believe it's still important to follow it, wherever it may lead.

So please watch some of the videos.

I'm really excited that Amy is coming to Colorado next month for Makerie and she'll be making an appearance at Fancy Tiger so I hope to meet her.

Here are some of the projects I have sewn with Amy Butler fabrics and Patterns, starting with aprons, except for two, most are my design.
Fabric lines:  Lotus, Belle, Nigella, Midwest Modern and Love


Clothing from cotton fabrics, I'm really looking forward to sewing with some of the new base cloth like rayon and voile.
Fabric lines Belle, Lotus, Daisy Chain and Nigella

Here are some aprons and clothing I made using Amy Butler patterns:
L to R:  Apron pattern from "In Stitches", Barcelona Skirts Apron Overlay (side 1 and side w), A-Line skirt, Anna Tunic front and back and Mini Dress, Tunic and Tops pattern, last two.

Below are some curtains and other home products I made with an enormous stash of Nigella fabric, I still love that whole line!   You can see the first pair of curtains  were in the bedroom, then moved to the living room because I made them WAY too full (photo 4), later to the kitchen (photo 5) and today they are in our new egress windows in the basement!  I kind of have decorator and home improvement ADD.
Home projects


Saturday, March 2, 2013

New and Improved Harlequin Apron Pattern

New Version of my Harlequin Apron and Rosie enjoying a nap on a warm March weekend, I may join her soon!
 I was recently contacted by a magazine about some of my patterns, which is exciting, but also led me to upgrade the only pattern I have produced for sale, the Harlequin Apron Pattern.  The magazine wanted a project that used pre-cuts so I had to also adjust the pattern to use pre-cuts, which was not difficult, the original pattern used 5" squares that you cut yourself.

I decided to make some new samples using Bonnie and Camille fabrics.  So far I have just made the one using a Vintage Modern charm pack and 1/2 yard of the coordinating fabric but I have Marmalade waiting in the wings.

Some history about this apron.  I love to scour thrift and antique shops for vintage aprons.  I found this one a few years ago and loved the way it was made with patchwork.  Sadly these are the only photos I took and I no longer have the apron!

My original pattern instructs you to cut your own squares by color for each row, as show in the original vintage version.

LOVE big bows and this rick rack trim, also yummy vintage fabrics!

Look how some of the squares had to be pieced just to make a 5 inch square, 
we are so spoiled today buying oodles of fabric whenever we want.
I did a lot of searching online and couldn't find a pattern for the apron so I made one myself and wrote this pattern.  Here is the first one I made using Shari Berry holiday fabric.
I made the bow long enough to wrap around and tie in front OR

You can also tie in the back.

 This shows you what the apron looks like laid out.


The finished "Vintage Modern" charm pack version.
I line my aprons and the pattern has full instructions for lining.


The new pattern is available in my Etsy shop and on Craftsy.
The original pattern is for sale in my Etsy shop.

Next project:  I'm writing a pattern for this apron.